Friday, November 17, 2006

Aloo Paratha (Potato stuffed Indian Bread)

Aloo Paratha

Well long time since I blogged. Life has become very hectic lately :) which I guess is a good thing but then I don't get the time to blog as often as I want to. I have so many pictures of so many recipes to post that my "to_post" folders are taking up more space than my "on_blog" folders.

I made these aloo parathas on a lazy Sunday afternoon and froze them in batches. This was my first time freezing the parathas and they were just as good as new when defrosted and heated up. Thanks to Saffron Hut for the freezing instructions.

I am going to post this as a multi-step process instead of my usual write-up template :).

Step 1: Boil 2-3 large potatoes until soft. Peel the skin. Put them in a food processor, about a teaspoon of cumin seeds, one or two green chilis, handful of cilantro, a little salt and pulse until the whole mixture forms a ball in the food processor. If you don't have a food processor all these ingredients can be chopped and mashed together as well.

Step 2: Combine 2 cups of chapathi/paratha atta (I used Golden Temple brand), a pinch of salt, a teaspoon of ajwain seeds and knead into a pliable dough with luke warm water. Cover with a kitchen towel and set it aside for about 30 minutes.

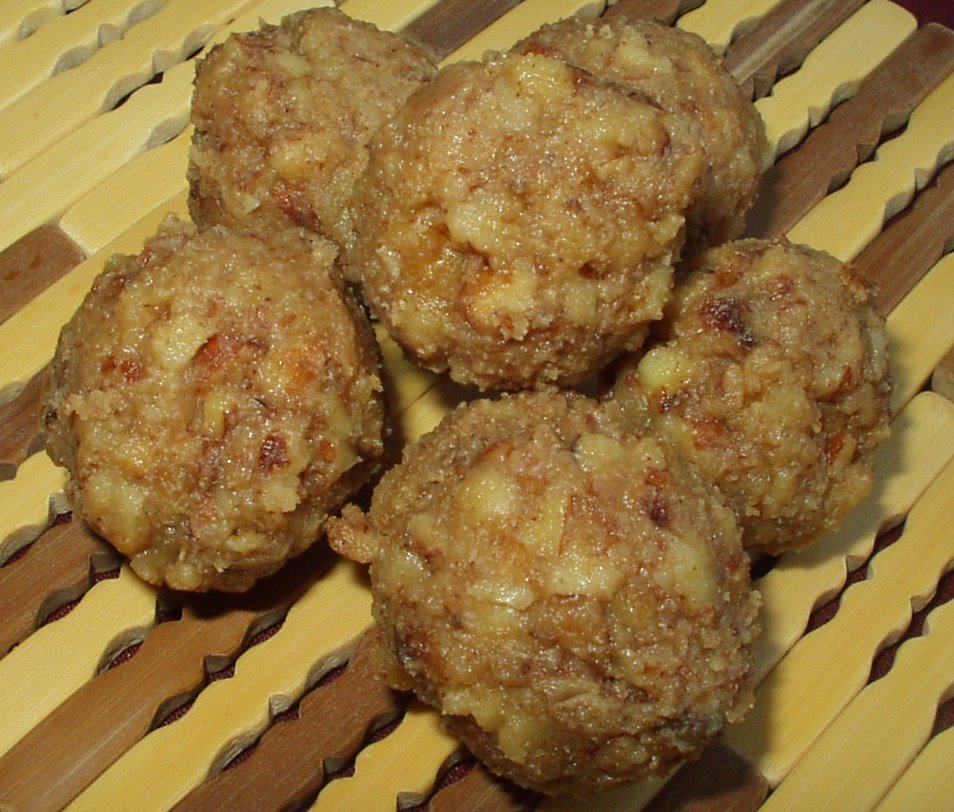
Step 3: Divide the potato mixture into lime sized balls and the chapathi dough mixture also into balls (make sure the dough balls are a little bigger than the potato ones).

Step 4: Now on a floured board or countertop, roll out the dough ball into a small circle, put the potato mixture in the center of the flour circle, and enclose the rest of the dough so it forms a circle and the potato ball is inside the flour ball.

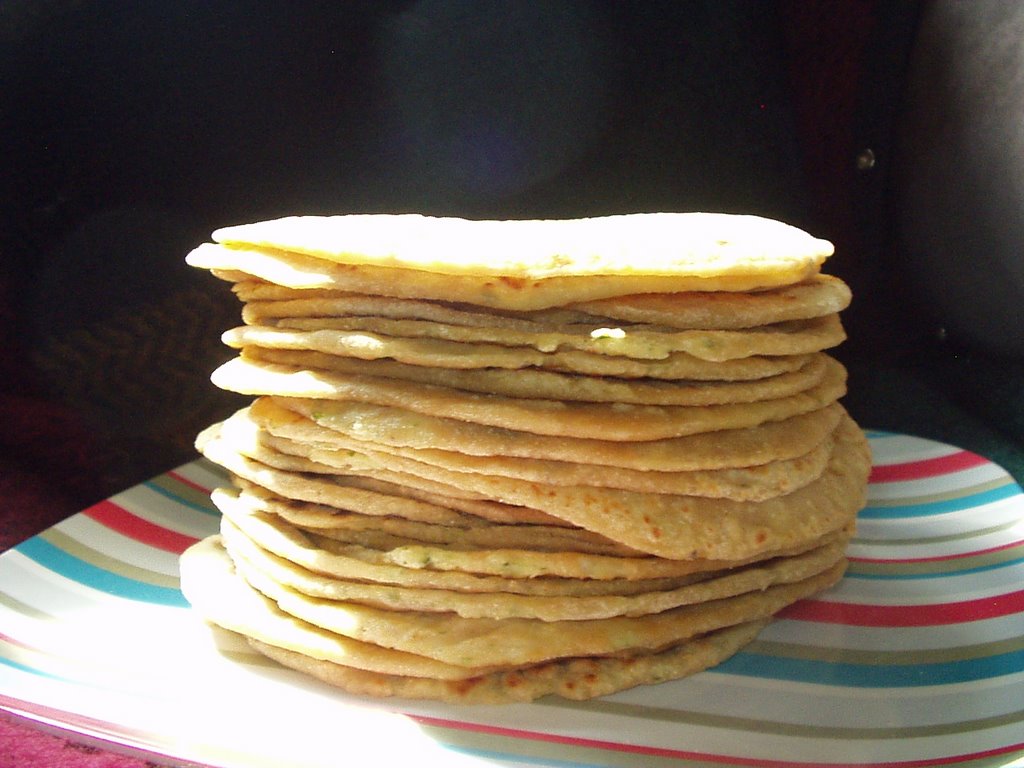
Ready to stuff the paratha with the potato mixture

Step 5: Roll the ball into about a 5-6 inch circle, fry it on a medium heat tawa on both sides with a little bit of oil until brown spots appear on the paratha.

Step 5: To freeze, let them all cool, alternate layers of wax paper, cover it tightly in an aluminium foil, date and freeze. I froze them in batches of 5 so I don't pull out all of them each time I took them out of the freezer.

Serving Suggestion: Serve with any pickle/achar and a side of yoghurt.

Tuesday, October 31, 2006

Happy Halloween!

Have a Happy and Safe Halloween, everyone! Here's my Halloween 2006 pumpkin, all lit up, ready to scare you :)!

BOO!


Tuesday, October 24, 2006

Murukulu - Deepavali Treat

murukulu - all ready to be gobbleed up

Murukku is a Deepavali tradition in our house. My mom would make these a day or two before the festival but preperations for this dish would start atleast 3-4 days ahead of the actual murukku making day because everything was made from scratch i.e. the flours, I mean.

The rice would be soaked in water for about an hour or two then it would be air-dried on a cotton cloth overnight. The next day, it would then be slow roasted in a pan on the stove in batches, then cooled. The urad dal would undergo the same process, except the soaking bit. It would just be roasted on the stove, then cooled. Then came our kids' chore of taking it to the flour mill to get the rice and urad dal mixture powdered to make into flour. My mom would give us special instructions to relay to the flour mill guy, to not combine the murukku mixture with any other grains (like wheat, jowar etc). She would even send with us some raw rice so the flour mill person could pour that in the mill before the actual Murkku grains went in so it would "clean" out the mill so it is devoid of the afore mentioned other grains. Going to the flour mill was the chore I hated the most growing up. I would always find ways to pawn the chore off to my siblings but it hardly worked :).

For those who are not familiar with the "flour mill(s)" I mention, these are usually one room establishments (atleast where I grew up), where they powder whatever you take. Be it be jowar grains, lentils, rice, wheat, anything you name it, they powder it for you to make into flour. Since it was only a one room place, that meant that the waiting area where you waited for your grains to be pounded was right next to the big machine that powdered the grains which also meant you would be covered in flour by the time you walked out of there. Sure you could wait outside on the street but I always loved to wait inside where I could watch the flour mill operator operate the big machine which also meant I was keeping a close watch on the grains I took so they are not adulterated by anything else :). Sometimes, there would be a line of "dabbas"/"boxes" and you would set your box in line and wait. Sometimes, you would be the only person there. It all depended on the time of year and the time of the day. Festive season would always be a busy time where everyone would bring those "special grains" get powdered - chana dal (for besan), rice (for murukku, chakili etc). During non-festive season, it would just be atta grains - wheat, jowar etc.

Wow...that was a walk down the memory lane I never intended to write about when I started this blog post :). When I look back, if feels as to how less complicated life was back then or so it seems :).

To make murukulu, you need a special gadget called the "murku maker/press". There are a couple to three of varieties of these and I have the one below. I like find this type because I feeel it is much easier to use than the makers, you have to "press". This one you just rotate and the disc on one end of spring sort of thing pushes down on the dough that is in the cylinder!

muruku maker/press

Software
---------------
  • 4 cups Rice flour
  • 3/4 cup Urad dal flour
  • 1/4 White Sesame seeds
  • 3 tablespoons Cumin seeds
  • 1 tablespoons Ajwain seeds
  • 1 tablespoons Ginger-Garlic paste
  • 1 tablespoon Chili powder
  • 4 tablespoons melted butter/shortening
  • oil for deep frying
Hardware
---------------
  • One large mixing bowl
  • One small mixing bowl
  • Large deep fryer
Method
---------------
  • Mix everything listed under the ingredients together in the large mixing bowl.
  • Now take about a cup of the flour mixture into the small mixing bowl, and by adding enough water make a dough that is not too tough or not too watery. It should be easily "pinchable".
  • Put this dough mixture in a Muruku maker and press or turn away (depending on what kind of press/muruku maker you are using) onto a clean cotton cloth or some aluminium foil into small disks as in the picture.
  • Meanwhile heat up the oil and deep fry the murkus in hot oil until well cooked and crunchy.
Tips and Techniques:
  • When making murukus in large batches, make sure that you do not make the dough all at once. Combine all the dry ingredients together and only make the dough when ready to put the dough into the mould.
This my second entry to Vee's Special Edition Jihva for Diwali Treats !

Saturday, October 21, 2006

Deepavali Shubhakankshalu (Happy Diwali)

Here's wishing everyone a very happy and prosperous Deepavali!

With the experience of making Ganesha with clay under my belt, I decided to make diyas with clay too! Here are some pics!

lighted "home made" clay diyas/deepalu

"home made" diyas waiting to be lighted

making the "home made" diyas with clay and paint

Thursday, October 19, 2006

Borugula(Kurmura, Churmura, Murmura, Puffed Rice) Laddu - Deepavali Treat

Diwali Treat - Kurmura Laddu

Well...with this post this cooking blog becomes an official laddu blog :). Just kidding...but it sure does seem like it? Doesn't it? Infact all Indian cooking blogs these days are starting to look like they are on mission to ruin everyone's diet plans. But it is the festive season afterall. And obviously as soon as the Indian Hindu festivals slow down for a while it will be time for Halloween, Thanksgiving and Christmas. Then comes Sankranthi again. So I don't think the "sweet treat" trend is going to end soon around here!

This time for Diwali I wanted to make a laddu I had never made before and was searching endlessly for an interesting recipe. As soon as I read Chandrika's poha laddu post I was immediately transported back to my school days when we used to get these borugula laddus in a small store outside our school for 10 paise each. You see, in my mind, flattened rice (Poha) and puffed rice (Kurmura) belong to the same category and hence the relation. They are even right next to each other in my pantry. I have an obsession with bundling "like" things together like that in the kitchen and everywhere else :). If any psychologists are reading this blog, feel free to post your 2 cents on what that tells about me hehe...

With Kurmura in mind, I went searching for a Laddu recipe and found a couple. I chose this one. I did make some changes to the proportion of ingredients and also added in brown sugar. It seemed pretty simple to make and it really is very simple as you will see below.

Software
---------------
  • 2 cups crushed jaggery
  • 1 cup packed brown sugar
  • 1 cup raw peanuts
  • 1 cup unsweetened shredded coconut
  • 4 cups puffed rice/kurumura/murmura/borugulu
  • 1 pinch caradamom powder
Hardware
---------------
  • one large heavy bottomed vessel
Method
---------------
  • First roast the raw peanuts in the vessel on low-medium heat until the peanuts starts to smell nuttly and are golden brown.
  • Fold a tea towel in half and put the peanuts on one half of the towel to cool. After the peanuts are cold enough to handle, cover the peanuts with the other half of the towel and rub gently on top of the towel with your hands. This is in order to remove the skin from the peanuts. Then gently blow air over the peanuts so the skin flys away. I usually do this at the sink and then clean it up later.
  • In the same vessel that we used to roast the peanuts with, put in the jaggery and brown sugar and add just enough water so that the jaggery is immersed in the water. Bring it to a boil and wait for the sauce to thicken. I followed the method described in the recipe on how to check the consistency of the jaggery syrup i.e. "add a few drops into a bowl containing water and it shall solidify immediately."
  • Turn off the heat and add the puffed rice, peanuts, coconut and caradamom powder. Mix it all together and allow it to cool.
  • I tried the "grease your hands with ghee and make laddus" for this and it did not work. The puffed rice mixture was too sticky and it was sticking to my hands big time. So I devised a new technique. I took a sheet of plastic wrap and then put a spoonful of the laddu mixture in the centre of the plastic, made that into a ball - voila - no sticking at all. So this recipe does not even need any ghee!
As you must have guessed it already, this is my entry to Vee's Special Edition Jihva for Diwali Treats !

Wednesday, October 11, 2006

Almond Walnut Laddoo

almond and walnut laddoo

In addition to the sunnundalu (urad dal laddoo) for Dasara, I also made these almond and walnut loddos. The inspiration for this laddos came from Indira's walnut laddoo post but I changed the recipe. I basically took an easy way out than her recipe, since I did not wait for the milk and sugar to get to a pala kova consistency that Indira describes in her post. Here is my version!

Software
---------------
  • 21/2 cups each walnuts and whole almonds
  • 1 tin sweetened condensed milk
  • 21/2 cups whole milk
  • 2 pinches caradomom powder
  • 3 tbsp ghee
Hardware
---------------
  • one small microwave safe vessel
  • one large heavy bottomed container
  • one food processor
Method
---------------
  • Dry roast the walnuts and almonds seperately in a pan over low to medium heat until toasty.
  • After the nuts cool down, grind them seperately in a food processor until the nuts are broken down into very small pieces but not completely powdered. It takes a little longer to process the almonds.
  • Meanwhile, boil the whole milk in a microwave safe vessel until it is hot and bubbly. This step can be eliminated and the milk can be directly boiled in the heavy bottomed container but I always boil the milk first in the microwave and then transfer it to the stove. The advantage of doing this is that milk does not get scalded in the microwave and the "stirring the milk" time gets reduced dramatically.
  • Transfer the milk to the heavy bottomed container add the condensed milk and heat on medium heat until the mixture thickens up (for about 10-15 minutes).
  • Add in the chopped nuts and the caradamom, stir often so it doesn't get scalded until it is thick and the mixture starts to leave the sides of the pan.
  • Add 2 tablespoons of the ghee and stir.
  • Leave aside until warm enough to handle.
  • Then apply a little bit of the rest of the ghee to your hands, and make round balls with the mixture.
  • Store the laddoos in an air tight container.

Tuesday, October 10, 2006

Jihva for Ghee round up

First off an apology for taking so long to do the round up. I have been extreremely busy and was gone the weekend and am going on another trip this weekend and next week. But better late than never and here is the Jihva for Ghee round up! Enjoy!


Neyyappam

By Beyond the Usual

Ghee, Riceflour, Banana, Jaggery


Besan Ladoo
from My Food Court
Ghee, Besan, Milk,, Sugar


Maa Laddo, Neiyi Urundai
from Menu Today

Ghee, Green Moong Dal, Sugar


Besan Laddoo

By Foodie's Hope

Ghee, Besan, Milk,, Sugar


Chickpea Flour Balls
By Autres Délices

Chickpea flour, ghee, brownsugar


Brown Ghee Rice and Mysore Pak from Out of The Garden
Brown rice, Ghee, spices (Brown Ghee Rice)


Ghee Mysore Pak from Menu Today
Ghee, Besan, Sugar


Brown Ghee Rice and Mysore Pak from Out of The Garden
Ghee, Besan flour, Sugar (Mysore Pak)


Mistress of Spices
from When My Soup Came Alive
Butter, Onion, Cloves, Garlic, Cumin, other spices


Flavored Butter from AkshayaPatra
Butter, spices & fruits


Carrot Kheer from Aahar
Ghee, Carrots, Milk, Sugar


Banana Bread Halwa from Cooking Pleasures
Ghee, Bread, Milk, Sugar


Ram Prasad Ladoo from A cook @ Heart
Ghee, Whole wheat flour, jaggery


Pineapple Kesari from Letzcook
Ghee, Sooji, Crushed Pineapple


Almond/Badam Halva from Saffron Hut
Ghee, Almonds, Sugar, Milk


Butter Shortbread from My Cook Book
Butter, All purpose flour, Sugar


Pongal from Akshayapatram
Ghee, Rice, Moong Dal, Chana Dal, Jaggery


Tangy Ghee Aloo from Chatpat Food
Ghee, Potatoes, Greenchilis, Lime juice, Sugar, Panch phoran tadka


Goad Bhaat
from Food for Thought
Ghee, Rice, Moong Dal, Jaggery, Coconut


Capsicum Rice
from My Experiments with Food
Ghee, Bell Pepper, Basmati Rice, Spices


Thank you to everyone that participated in the event this month and I want to thank Indira for providing me the opportunity to host!

Next month's Jihva event is being hosted by Vee of Past, Present and Me. Get details in her Special Edition Jihva post!

Tuesday, October 03, 2006

Quick Jihva Post

Just a quick Jihva related post - it will still be a couple more days by the time I do the round up. But please send in the entries if you have them. The ingredients are butter and ghee!

Sunday, October 01, 2006

Jihva for Ghee and Butter - Sunnundalu

sunnundalu for Jihva for Ghee and Butter

Butter and Ghee are integral ingredients of Indian cooking. They are not only used in cooking but also in a lot of religious Hindu ceremonies. Ghee is considered a "sacred" ingredient.

Ghee is used more extensively than butter atleast in my home. During most of my childhood days, my grandmother always made ghee and sent it to us. My grandparents had farms and they had buffaloes(not the American buffalo) and cows among other animals. So the ghee was pure, fresh and unadulterated, always. I remember my grandmother, meticulously skimming off the cream that forms a layer after boiling milk. She would then save the cream for some days, then churn it, extract the butter. That butter would then be turned into ghee. Then in my teenage years, my mom started making her own ghee which was because of the fact that grandmother wasn't keeping well.

I never ever remember seeing a package of the Amul butter or any store bought butter or ghee in our house. Even now, my mom makes her own ghee. In fact, the first time I used a "stick butter" in my life was when I came to the U.S.

So as you can all tell, I am very happy to host this month's JFI as ghee does hold a special place in my heart.

With ghee, I made an Andhra favorite, "Sunnundalu". This is also one of the specials I made today hence it is Dushera tomorrow. These are so simple to make but it still is so very delicious.

Software
---------------
  • 1 measure urad dal
  • 1/2 measure sugar
  • Approximately 1/4 measure freshly made ghee
  • Caradamom powder
Hardware
---------------
  • One frying pan
  • One mixing bowl
Method
---------------
  • Dry roast the urad dal on low heat until golden brown, toasty. Stir often while doing it.
  • Powder the urad dal until very fine in your favorite grinder.
  • Powder the sugar until very fine.
  • Mix the roasted urad dal powder, the sugar and the caradamom powder with your hand until well combined.
  • Add ghee slowly in installments and mix the flour, sugar mixture while doing it until it the ghee is absorbed so that you can make balls with it.
  • Make round balls of the laddu and savor as dessert!
PS: The urad dal flour and sugar mixture (without the ghee) can be stored in an air tight container in the refigerator for a couple to three months. When ever a sweet tooth hits you, put some ghee in it and make the laddus :).

Thursday, September 21, 2006

Jihva for Ghee and Butter

I realize that it is a little too late but on popular demand, I have decided to add clarified butter and compound butter to the Jihva ingredients for this month! So it is now "Jihva for Ghee and Butter!". Have fun everyone!

Check out the JFI post here

Wednesday, September 20, 2006

Chocolate Chip Cookies - Got Milk?

cookies cooling off on the baking racks

When it comes to chocolate chip cookies, I do not experiment with the recipe a lot. I do not go out searching or looking for new chocolate-chip recipes as the two recipes I have work perfectly! One is an egg-less chewy/cake-like chocolate chip recipe that and the other one is a Nestle Toll House chocolate chip recipe(printed on the back of the nestle tollhouse semi-sweet chocolate chips pacakge).

I do not have a picture for the eggless recipe but herez the recipe!

Software
---------------
  • 2/3 cup packed brown sugar
  • 2/3 cup white sugar
  • 2/3 cup margarine
  • 2/3 cup butter
  • 2/3 cup plain lowfat yogurt
  • 2 teaspoons vanilla extract
  • 1 teaspoon almond extract
  • 2 1/3 cups all-purpose flour
  • 3/4 teaspoon baking soda
  • 3/4 teaspoon salt
  • 2 cups combination chocolate chips(semi-sweet, dark and white)
  • 1 cup chopped walnuts (optional)
Hardware
---------------
  • 1 small mixing bowl
  • 1 large mixing bowl
  • electric mixer
  • cookie sheets

Method
---------------
  • Preheat oven to 350 degrees.
  • In a small bowl, combine the flour, baking soda and salt until well combined.
  • Cream together butter, margarine, the sugar until light and fluffy.
  • Add in the low-fat yogurt (I used the home made one) and the extracts, beat until well incorporated.
  • Add the flour in 3-4 installments mixing/beating well after each addition.
  • Mix in the chocolate-chips and the walnuts at the very end.
  • Drop on greased cookie sheets in 1 tbsp quantities (2 inches apart) and bake for about 10-12 mintues or until golden brown on the sides.

For the second recipe, I follow the nestle toll house recipe with slight variations.
  • Instead of 2 sticks of butter, I use 3/4th stick soy based margarine and 3/4th stick real butter.
  • Instead of all semi-sweet chocolate chips, I use a combination of dark chocolate chips, white chocolate chips and semi-sweet chocolate chips.
  • I increase the vanilla extract quantity to 2 teaspoons and add in a teaspoon of almond extract.
close up of the cookies

PS: The pictures were taken by one of our good friends, K when he came to visit us :)! There...K I gave you credit ;)...

Sunday, September 17, 2006

Well and Alive!

basil flower arrangement from basil flowers picked from P&V's garden

Hello everybody! Just a quick note to let you all know that I am alive and well.

I know I have been absent for a while. I have been cooking a LOT (more than I have ever cooked in my entire life) but haven't been having any time to blog lately! We have been busy entertaining friends at our new house. Someone said "your house must be very warm already" as a joke in reference to the "house-warming" parties we have been having at the house :).

Anyway, I hope to be back in blogging next week atleast for a little while before going dormant again :).

Tuesday, September 05, 2006

Moist, Dense and Delicious - Zucchini Bread

First off, I want to welcome Candace from Sugar Daisies into the food blogging world. She started up a baking blog just today so go check it out :)! Good luck, Candace and I cannot wait to try out your recipes!

On to the bread :) - couple of weeks ago, one of my friends that has Zucchini in her garden gave me some. I made some zucchini chutney with some and shredded the rest of it in the food processor and froze it in 2 cup measurements (2 cups coz most bread and muffin recipes seem to ask for 2 cups).

Yesterday, I baked some zucchini bread with it. The bread was the most moist, dense and delicious bread. I made a hybrid recipe out of Elise's zucchini bread with Paula Deen's recipe I found on food network's Website.

zucchini bread, sliced and ready to eat

Software
---------------
  • 3 eggs
  • 1 cup olive oil
  • 2 cups sugar
  • 1 tbsp vanilla
  • 2 cups grated zucchini*
  • 1 tbsp lemon juice
  • 3 1/4 cups all purpose flour
  • 2 tsps baking soda
  • 1 tsps salt
  • 1/2 tsps baking powder
  • 1 1/2 tsps cinnamon
  • 3/4 tsp nutmeg
  • 1 cup chopped walnuts
* Add in about 1/2 cup of water if using freshly grated zucchini. I eliminated the water since I was using frozen (defrosted) zucchini

Hardware
---------------
  • 2 loaf pans
  • 1 small mixing bowl
  • 1 large mixing bowl/mixer
Method
---------------
  • Preheat oven to 350 degrees.
  • In a mixer or using a hand mixer and the large mixing bowl, beat the eggs. Add the sugar, oil, vanilla and lemon juice. Mix on low-medium speed for about 2-3 minutes until well combined and thick. With a wooden spoon, mix in the zucchini.
  • In the small bowl, combine all the dry ingredients (flour, salt, baking soda, baking powder, cinnamon, nutmeg).
  • Add the dry ingredients gradually into the wet ones, mixing well after each addition. Add in the nuts at the very end.
  • Pour into the loaf pans, bake for about 50-60 minutes or until toothpick inserted comes out clean. Cool in pans for 15 minutes, invert them on to cooling racks to cool completely.
Thank you Elise for your recipe. It is definitely a keeper :)!

Monday, September 04, 2006

Jihva for Ghee and Butter

Addendum (Sept 21): I realize that it is a little too late but on popular demand, I have decided to add clarified butter and compound butter to the Jihva ingredients for this month! Have fun!

Indira of Mahanandi started a great revolving event that she aptly named "Jihva for Ingredients (JFI)". Indira has a wonderful post about what JFI actually means and what it is is for. Please go read about it right now!

Previous JFI events were hosted by Indira, Baking Fairy, Sailu, Santhi and Vineela!

This month it is my turn to host JFI. When I started thinking about the ingredient I wanted to choose, I had two criteria - an ingredient that is very Indian and also one that went with the "time" of the year. September and October this year are the festival months in India. Hence I am choosing "Ghee" as this month's JFI ingredient.

Now to the "rules specific to this edition of the game" -
  • Even though people out in the Internet world seem to use the term "clarified butter" and "ghee" interchangably, clarified butter is definitely not ghee. When making ghee from butter, clarified butter is a stage that you have to cross to get to ghee. Clarified butter takes a lot less time to make than ghee. When making clarified butter, since the butter is not cooked for such long time, all of the water and milk solids are not removed from the butter, so clarified butter has a much shorter shelf life and hence a little less flavorful (in my opinion). Unlike butter or clarified butter, ghee can be heated to a much higher temperature and things can actually be deep fried in ghee unlike butter. On this topic Indira mentioned that the "Joy of Cooking" has a section on ghee and clarified butter in the "butter" section (thanks, Indira for pointing that out!).
I would appreciate if all of you take a note of above and make something with ghee rather than with clarified butter. Indira has a great post on how to make ghee. I make my own ghee from unsalted organic butter and here is some fresh ghee that I made last night.


Now to the "general rules that I copied from Indira's event":

1. Prepare a recipe featuring ghee - cook/bake/fry/saute/braise/ with it - do whatever you please but ghee has to be the "star of the show" :).
2. Post the recipe on your blog on October 1st, Sunday.
3. Send me via email (cookingmedley gmail com) - the link to your post and a photo of the entry in 75×75pixel size.
4. Please include the title of post and your blog name.
5. I’ll post an entry along with you on October 1st and also will do the roundup of all the entries that I received by that week’s end.
6. Nostalgic tales, paintings, and drawings, anything related to ghee is welcome from interested general (non-food) bloggers.

So, put on your aprons, have fun and a very happy festive season to everyone!

Wednesday, August 30, 2006

More on Vinayaka Chathurthi

I have been extremely busy both at work and at home. So this post is only going to be pictures. Some of you have asked me what I made on Vinayaka Chathurthi day. I made pulihora, daddojanam, undralla payasam and biyyam (rice) undrallu.

The undrallu payasam is a pretty eloborate payasam and preperation for it starts a couple - three days before the payasam is actually made. I will try and do a write up as soon as I can.

Since Ganesha is at home, I have been making naivedyam for him everyday! On Monday, I made sesame and jaggery laddoos, Tuesday it was sweet potato halwa (I lost the picture of the halwa) and it was semiya payasam this morning!

food on Vinayaka Chathurthi - daddojanam, undralla payasam, biyyam undrallu and lemon rice (top to bottom)

making the undrallu for the undralla payasam

the undrallu all ready to be made into payasam

3 minute sesame seed and jaggery balls

10 min semiya payasam

Saturday, August 26, 2006

Happy Vinayaka Chathurthi


home made Ganapthis/Vinayakas/Ganesh with clay and colors

Happy Vinayaka Chathurthi to everyone! Enjoy our "home made" Ganapathis. This is how a few of us spent our Friday night last night - by making our own clay Ganeshas. This is the first time I have done and will not be the last time :). This was so much fun!

Monday, August 21, 2006

Angel Hair Pasta with Sun-Dried Tomatoes, Black Olives and Basil

angel hair pasta with sun-dried tomatoes, olives and basil

This is another 20 minute meal. Perfect for days like today - we ate a little too much for lunch so something light and refreshing like this is perfect for dinner. Straight to the "recipe".

Software
---------------
  • 3 tbsp extra virgin olive oil
  • 1 small onion, finely diced
  • 3 cloves garlic, finely minced
  • 1/2 cup black olives, sliced
  • 3.5 oz sun-dried tomatoes, sliced
  • 1 tbsp crushed red pepper (optional)
  • 1/4 cup milk/half and half
  • 1 cup chopped fresh basil
  • salt and freshly ground pepper, to taste
  • Angel hair pasta
Hardware
---------------
  • one skillet (NOT a non-stick skillet)
  • one stock pot for the pasta
Method
---------------
  • First off, boil water in the pasta pot for the angel hair.
  • Put the non-stick skillet on medium heat, add the oil. Add in the garlic and the onions, fry until translucent.
  • Add in the red pepper, black olives, sun-dried tomatoes, freshly ground black pepper and salt.
  • The pasta water should be boiling by now. Add in the pasta and some salt. Let the pasta cook.
  • Cook the sauce for about 3-4 minutes then add in the milk/half and half and deglaze the pan. Turn off the heat, add about 3/4th of the basil.
  • Toss the sauce with the pasta, serve. Garnish with the rest of the basil.
sun-dried tomato pasta sauce cooking

Update: As per Vaishali of Happy Burp's idea I am inlcuding this "extra" - When I was gathering ingredients from the refrigerator to make this pasta, my eyes did fall on the jar of half used capers and I thought of putting them at the end but I completely forgot about it until I was done eating the pasta. But a tablespoon or two of capers, added at the very end right before the milk would go very well with this pasta. Also, instead of the milk, one could deglaze the pan with some wine if you like going that route :).

Thursday, August 17, 2006

Sauteed Paneer Spinach and Carrots

sauteed paneer, spinach and carrots with phulkas
(the phulkas are made of 3/4 parts whole-wheat flour and 1/4 parts golden temple atta)

Tonight was one of those nights - the nights when I come home with a thoughtout plan for what to make for dinner but then something happens which affects the plans I had in mind. I wanted to make "chamadumpala pulusu" (colacasia in tamarind gravy) with phulkas but upon opening the cabinets, I found that I waited too long to make the dish. The colacasia I got were already bad and had white spots on them (ewww) - had to pitch them. Then I frantically looked in the freezer and didn't find any veggies that I wanted to cook with but found some home made paneer. In the refrigerator were some carrots and a bag of baby spinach. I made a quick decision and decided to whip up something with what I had on hand. What I should say is that it was a HUGE hit. We loved the end result. The most appealing aspect of this dish is that it took all of 20 minutes to make it (It will probably take me more time to actually type out this recipe).

Software
---------------
  • 1 tsp extra virgin olive oil
  • 1 tsp each of cumin and mustard seeds
  • 1 small onion, finely diced
  • 5 green chilis, finely chopped
  • 2 garlic cloves, finely chopped
  • 5 carrots, finely diced
  • 10-12 one inch paneer cubes
  • 10 oz bag baby spinach
  • 1/4 tsp turmeric powder
  • 1 tsp coriander powder
  • 1 pinch garam masala (roasted cinnamon, cloves, caradamom and shahjeera powder in equal amounts)
  • salt, to taste
  • handful chopped cilantro (optional)
Hardware
---------------
  • One medium sauce pan with a lid
Method
---------------
  • To start off, put the finely chopped carrots in a microwave safe vessel, sprinkle about a couple of tablespoons of water and microwave covered for about 4 mins until the carrot is soft but not mushy.
  • Put the sauce pan on medium heat, add the cumin and mustard seeds. Let them splutter.
  • Add the green chilis, onions and garlic, fry until onions are translucent.
  • Then add in the microwaved carrots and the paneer. Add in the salt. Cook for a couple of minutes stirring often. As you stir crumble up the paneer.
  • Add the baby spinach. The spinach may act like it doesn't want to get in the saucepan, but just jam it in there and close the lid and cook on medium heat for about 3-4 minutes.
  • Open the lid and the spinach should all be wilted, stir well.
  • Check the salt and add the coriander and the garam masala powders. Turn off the heat.
  • Garnish with cilantro.
Dessert tonight was Elise's Banana Bread with vanilla icecream and a drizzle of some hot fudge. The only change I made to Elise's recipe is that I added 1/4 tsp of nutmeg, reduced the sugar to 3/4 cup and added in about 1/4 cup of chopped walnuts. Thank you, Elise. That recipe is a keeper - so easy to remember and simple to make. Made the most moist and delicious banana bread!

banana bread w/ vanilla icecream and hot fudge