Sunday, April 30, 2006

Mamidikaya Pachi Pulusu

YAY! My second mango post of the year! Can you sense my excitement? The first dish was raw mango pulihora.

Usually when things are made with raw mango, it is best to use mangoes that are a little sour. Using the sweet raw mango does not do justice to this dish and the pulihora.

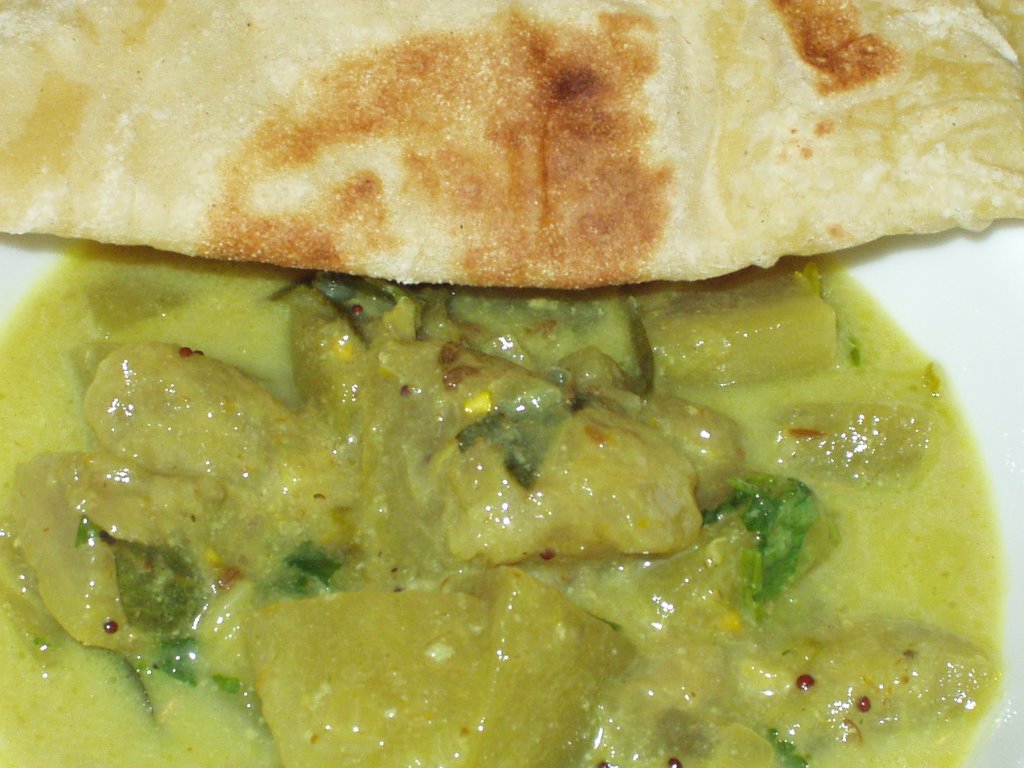
Firstly, I want to explain what this Telugu recipe title means. The word "mamidikaya" means raw mango. The word pachi means, raw. Pulusu is used primarily for tamarind sauce. The word pulusu originated from the word "puli" in Tamil which means tamarind. In this case though, there is no tamarind involved. I have my own reasoning of why it is called pulusu though. This same exact dish is made with tamarind pulp instead of mango. Now, way back when, who ever discovered that this could be made with mango, decided to just throw in the word mango infront of the already existing regular "pachi pulusu" ;). I could be totally wrong, so don't take my word for this :).

This particular dish "pachi pulusu" is very common in the "Telangana" region of my state Andhra Pradesh. This is a very easy recipe, that is usually served cold with hot rice. I only make this simple, comforting dish once or twice a year that way I feel it doesn't loose it's "charm" :). That is just my theory though!

As soon as Indira of Mahanandi announced the Jihva event and announced May's theme (mangoes), two dishes came to mind. One of them was mango jam (Indira has already blogged about it) and this one! I was hoping Indira wouldn't make this before me.
For the pulusu:

Software
---------------
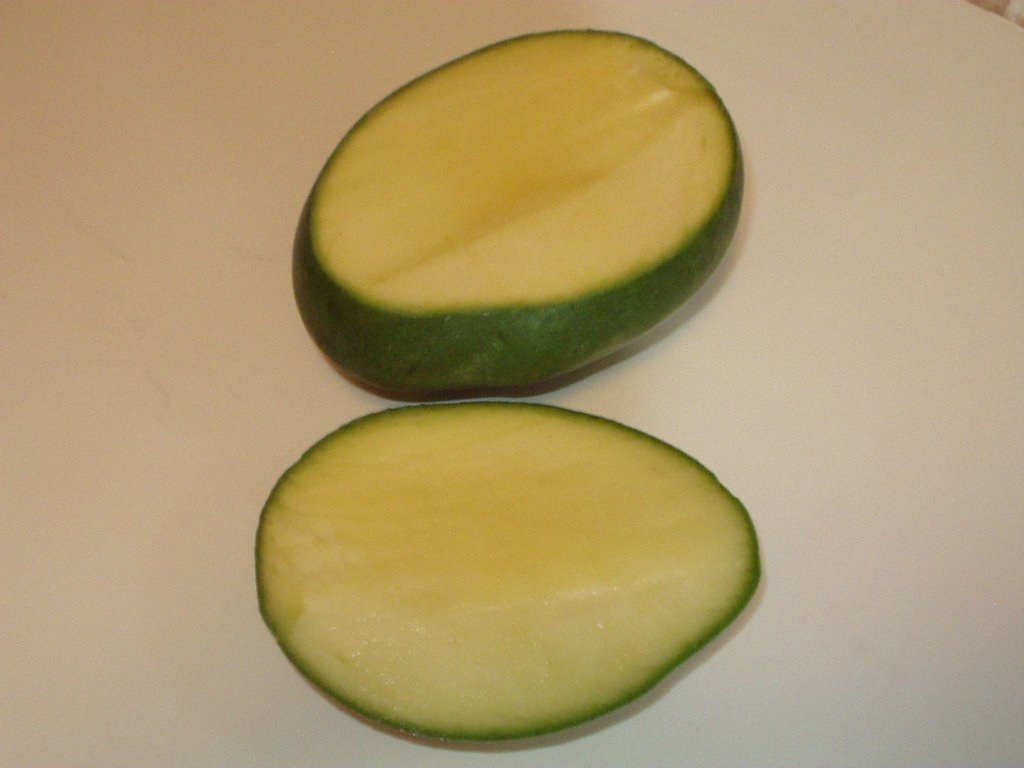
  • 1 small-medium non-ripe mango (preferably sour)
  • 1/4 cup finely chopped onions
  • handful - chopped cilantro
  • salt to taste
Hardware
---------------
  • One medium sauce pan
Method
---------------
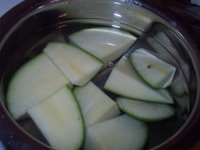
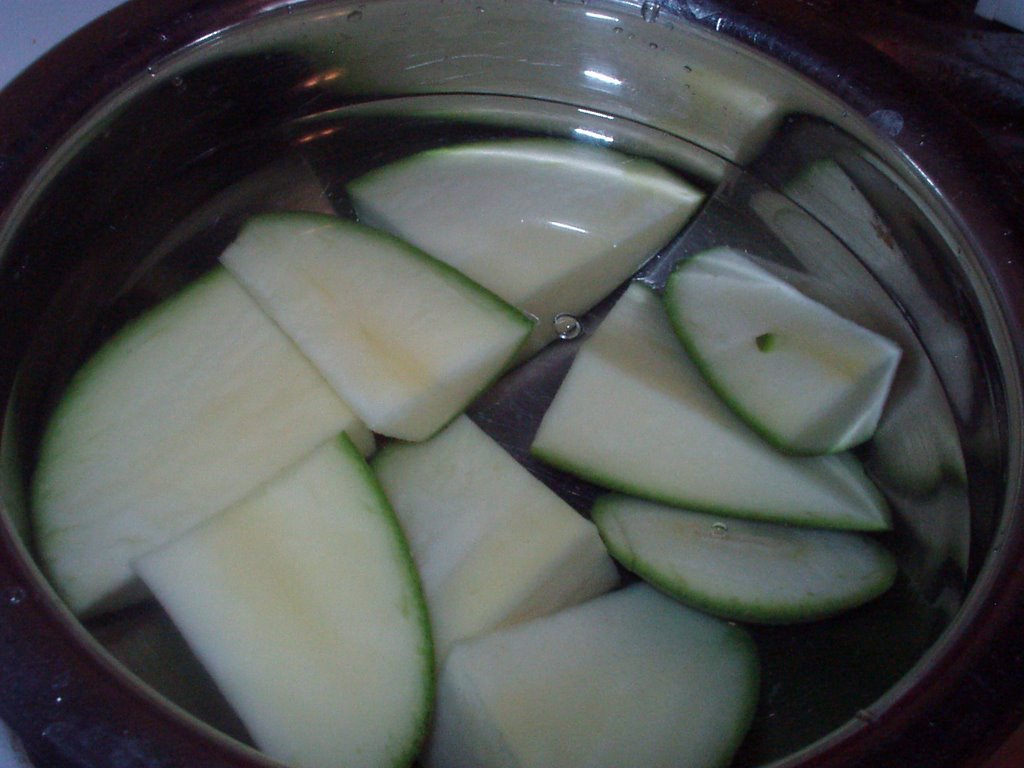
  • Peel the mango and cut the mango into 2-3 inch slices. Put the pieces in the pan, add water so that all the mango pieces are well covered and the water is a couple of inches above the mangoes. Add salt, and boil the mango on medium-high heat until the mango breaks apart when touched with a fork.
  • After the mango mixture is cold enough to handle, using a potato masher mash up the mango pieces or just use your hand and mash it up. I put 4-5 ice cubes in the mixture to ensure fast cooling.
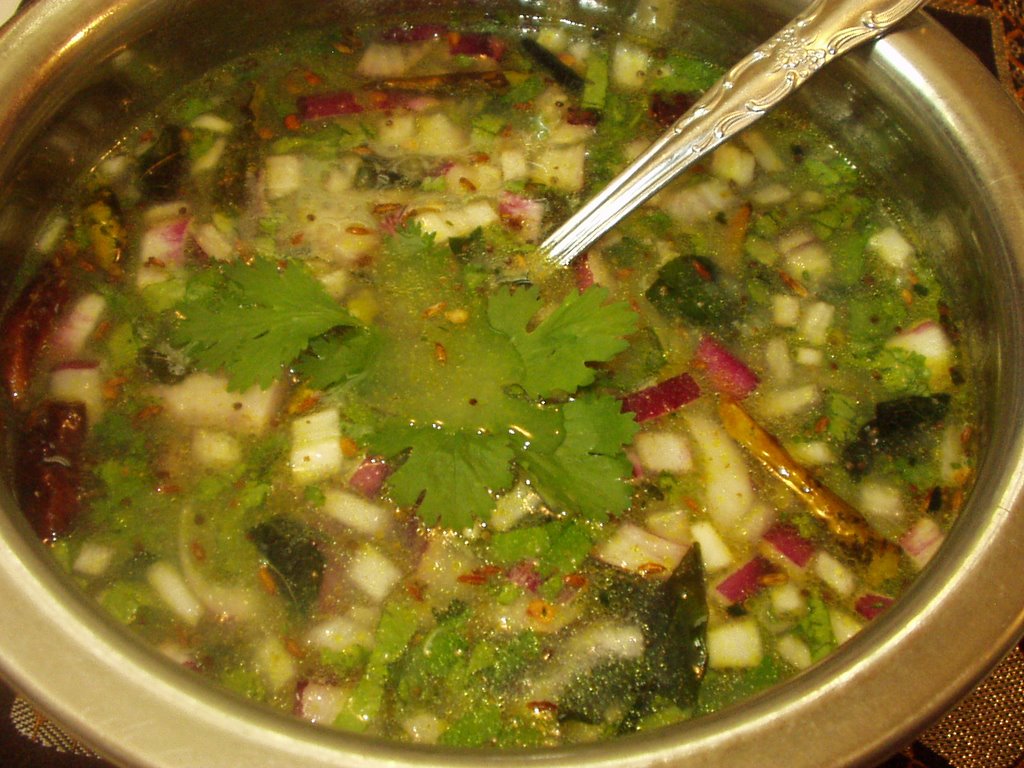
  • Add more water as necessary, so it has the soupy, rasam consistency. Add the onions and the cilantro. Keep aside.
For the tempering or tadka:

Software
---------------
  • 1 tbsp extra virgin olive oil
  • 3-4 Indian green chilis, sliced legthwise in half
  • 1 broken red chili pieces
  • 1 tsp jeera seeds
  • 1 tsp black mustard seeds
  • 1 sprig curry leaves, cut in half
  • 1/2 tsp turmeric powder
  • 1/2 tsp coriander powder
Hardware
---------------
  • Small cast-iron skillet or a small saucepan
Method
---------------
  • Add the oil to the pan. Add the remaining ingredients, in the same order and turn off the heat after the mustard and jeera seeds splutter.
Add the above tempering to the pulusu prepared in the previous step. Check for salt and add more if necessary.

Serving Suggestion: This is best served with hot rice. It is also good after it rests for a couple of hours so the flavors get absorbed.

Update: In the above post, I first ask to peel the mangoes then boil them, but if you see the picture, I did not peel the mangoes before I boiled them. I did it the way mom does it back home. After the mangoes are mashed up the skin is extracted out and discarded. Since that seemed like a cumbersome method than first peeling and boiling the mangoes, I wrote up the post that way! I am surprised that no one noticed it and asked me about it :)!

Tuesday, April 25, 2006

Yu Choy Dal/Pappu

On my way out of the Oriental Store last week my eyes fell on the counter and I saw a bunch beautiful green leafy vegetable stalks that had tiny yellow flowers. I asked the person-in-charge what the green was and she said it was "Yu Choy". I asked her if she knew how the vegetable tasted. She said it tasted like spinach and offered me some to try. I tasted it and I felt like it tasted like spinach too :).

For a green leafy vegetable deprived Indian here in the US, I jumped at the opportunity. I bought half a pound of it. When I came home, I googled the name and found a TON of references to it. I learnt that Yu Choy is edible rape and it is widely used in Chinese cooking. It is used to make soups and also used in stir fries. That is all I needed to know make "Yu Choy Dal" out of it. I basically plucked the leaves from the stalks and roughly chopped them up. I did not have the hearts to throw away the stalks so I just ziplocked them and put them back in the fridge. I am thinking about throwing them into some soup.

Now coming to the dal, I did spice the dal up a bit than I usually do by adding cloves + cinnamon + elaichi powder, a tsp of coriander powder, a tbsp of ginger. When the dal was cooking, it eminated a lot of fragrance than when I cook a regular spinach dal. It was hard for me to figure out if it was because of the additional spices I added or just the Yu Choy itself smelled so good. But whatever was the case, it just made it really hard to wait for it to finish cooking. I had to release the pressure for the cooker manually just so I could get my hands on the dal. And I should mention that this is a very easy recipe to make.

On to the recipe now

Cooking the dal

Software
---------------
  • 1 cup toor dal
  • 1/2 lb Yu Choy with stalks, leaves plucked and chopped. Roughly 2 cups of packed, chopped Yu Choy leaves
  • 1 medium onion, coarsley chopped
  • 2 cloves garlic, minced
  • 4-5 Indian green chilis, split in half
  • 1 tbsp finely chopped ginger
  • 1/2 tsp turmeric powder
  • 1 tsp coriander powder (optional)
  • 1/2 tsp (cloves + cinnamon + caradamom) powder (optional)
  • salt to taste
Hardware
---------------

Pressure cooker

Method
---------------
Put all the above ingredients in a pressure cooker and add about 4 cups of water and pressure cook until 3 whistles.

For tempering/tadka

Software
---------------
  • 1 tsp extra virgin olive oil
  • 1 tsp mustard seeds
  • 1 tsp jeera seeds
  • 1 tsp urad dal
  • 1 broken red chili pieces
  • 1 sprig curry leaves, chopped in half
Hardware
---------------
Small cast iron skillet/tempering pan or smallest sauce pan available

Method
---------------
Put the oil in a pan on medium-high heat, add all the ingredients in the order listed. Take off from heat after the mustard and jeera seeds splutter.

Add the tempering to the dal above, garnish with chopped cilantro.

Serving Suggestion: This goes really well with chapathi or rice.

This is also my entry to Sweetnick's ARF/5-a-day Tuesday this week!

Wednesday, April 19, 2006

Mango Pulihora - Mamidikaya Pulihora

This is my first mango post of the year! YAY. I am so excited. If I was asked to pick one fruit to take with me to live on a deserted island, I would most definitely pick Mango. When I was in India, in the summer months, we practically lived on Mangoes. There used to be days where every dish cooked for lunch/dinner had a hint of mango in it - starting from drinks, to main course to dessert because of the abundance of the mangoes. Sadly, it is not the case here. I bought raw mangoes at over 2 dollars a pound here :( and it does not take a lot of mangoes to put a hole in the pocket.

Indira of Mahanandi has blogged about this recipe before. My recipe is akin to hers except for a few minor changes. Back home in India, this pulihora is made for the first time that particular year on Ugadi day. It so happened way back when that raw mangoes appeared in the markets only a day or prior to Ugadi but in these days, you see them a lot earlier than that. But my mom tries to keep the tradition alive by NOT cooking anything with raw mangoes before Ugadi even though the rest of the family wasn't fair :).

Here goes the recipe..

Software
---------------
  • 2 cups cooked rice - with grains seperate (I used sona masuri)
  • 1 to 11/2 cups peeled, grated mango
  • 5-6 Indian green chilis - slit lengthwise
  • 2-3 broken red chili pieces
  • 1 tbsp ginger grated/chopped fine
  • 1/4 cup broken cashew pieces
  • 1/4 cup raw peanuts
  • 1 tbsp chana dal soaked in hot water for 5-10 minutes
  • 1 tsp mustard seeds
  • 1 tsp jeera seeds
  • 1 tsp turmeric powder
  • 1 tsp coriander powder
  • 1 sprig curry leaves
  • 2-3 tbsp extra virgin olive oil/any other oil you prefer
  • one handful chopped cilantro (optional)
  • salt to taste
Hardware
---------------
One pan

Method
---------------
  • Put the pan on medium heat. Add the oil.
  • Add the slit green chilis and the red chilis. After about 30 seconds, add the curry leaves, ginger and the cashews. After about another 30 seconds, add the raw peanuts. Fry this until the cashews and peanuts are slighly golden brown. Add the soaked chana dal. Fry for another 30 seconds.
  • Add the mustard seeds and the jeera seeds. After they splutter, add the turmeric powder. Stir well.
  • Add salt and coriander powder, stir. Add the grated mango, chopped cilantro and fry by stirring for another 1-2 minutes. Turn off the heat.
  • After this mixture cools down until you can handle, mix it with the cooked white rice. Use your hands so the mixture gets incorporated well with the rice (wear food-safe gloves to avoid the yellow color on your hands).
  • Serve!

Friday, April 14, 2006

My Take On Asparagus Poriyal/Vepudu (with dal powders)

I have never made poriyal before. Sure, I did saute veggies before and added coconut to it. I am not sure if that is poriyal though. I would love to be enlightened :). Poriyal as far as I know is a Tamil dish and basically a dry saute of veggies without adding any water. I am not sure if the word alone means something. Tamil friends, please enlighten me here :).

I had some asparagus leftover from my sphaghetti squash and asparagus lettuce wraps and decided to cook them up Tamil style. I say "my take" in the title above because I *think* I may have altered the basic poriyal recipe by adding some additional ingredients especially the masala. I had seen one of my Tamil friends do this for a totally different recipe and I felt like adapting it :).

Okay, so here I go!

Making the masala

Software
---------------
  • 3 tbsp chana dal/shanaga pappu
  • 2 tbsp urad dal/minapa pappu
  • 2 tbsp toor dal/kandhi pappu
  • 2 tbsp coriander seeds/dhaniyalu
  • 8-10 Indian red chilis/mirchi
Hardware
---------------
one small pan

Method
---------------
  • Dry roast all the ingredients seperately and cool. Grind everything in a spice grinder. You will only need about 3 tbsp of this masala for the asaparagus. Store the rest in an air tight container for later use.
Making the poriyal

Software
---------------
  • About 20 stalks of asparagus
  • 1 medium onion, chopped finely
  • 2 cloves garlic, minced
  • 1 inch ginger, minched
  • 2 tbsp of freshly grated coconut (or dry if fresh not available)
  • 1 tsp mustard seeds
  • 1 tsp cumin seeds
  • 1 sprig curry leaves, cut in half
  • 3 tbsp of the above masala powder
  • salt to taste
  • 1 tbsp extra virgin olive oil
  • 4 tbsps of chopped coriander leaves
Hardware
---------------
One pan

Method
---------------
  • Cut off the woody stems on one end. To easily tell where to cut, Hold one asparagus in your hand and slowly bend it, it naturally breaks into two pieces, about 2-3 inches on one end. Cut the other asaparagus stalks using the same method, using the one broken one as a guide.
  • Then cut the aspargus into very small pieces - about 1/2 inch pieces.
  • Put the pan on medium heat, add the oil to the pan, add the mustard and cumin seeds. Add the curry leaves after they splutter. Add the onions and fry until they are translucent. Add the garlic and ginger, fry for a minute or so.
  • Add the asparagus pieces, stir, cook for a couple of minutes. Add salt.
  • Increase the heat to medium-high, cook for about 5-10 minutes until the asparagus is soft. I had to add about 1/3 cup of water to help it cook half way through the process because it was sticking to the pan. But the water eventually evaporated so that wasn't an issue.
  • Sprinkle about 3 tbsp of the masala to the asparagus, stir and cook for another couple of minutes. Turn of the heat.
  • Sprinkle the cilantro leaves.
The poriyal was surprisingly good. I could not believe how easy it was and how wonderful it tasted. I think I took the poriyal off the heat before it was all the way cooked so it still had the crunch to it and I loved it. So it is up to you, you can either cook it until it is totally soft or leave a little crunch to it. Asparagus is going to make it to my shopping list more often now!

Serving Suggestion: I ate this with both chapathis and rice with some rasam and it tasted heavenly both ways.

PS: Two of my three entries (spinach chutney w/ chapathi chips and panini - desi style) submitted for VKN's cooking competetion have been selected for voting. If you like my entries, please show your support by voting for my entries. Thank you!

Monday, April 10, 2006

Spinach Chutney with Chapathi Chips - VKN's Cooking Competetion Entry III


We Indians are known to make chutney out of everything - fish, eggs, chicken, lamb, all vegetables, fruits etc :). My mom made this chutney with all green leafy veggies so we would eat the greens. I love all types of greens in this chutney form. This is a very simple recipe with lots of flavor and health :).

This chutney paired with some chapathi chips is my submission to VKN's cooking competetion and Sweetnick's ARF/5-a-day Tuesday.

My other entries to VKN's cooking competetion are:
Spinach Chutney

Software
---------------
  • 9 oz package pre-washed spinach leaves
  • 1 tbsp chana dal
  • 1 tbsp urad dal
  • 1 tbsp coriander seeds
  • 6-7 methi seeds
  • 1 tsp jeera
  • 4-5 dried red chilis (add more or less to your taste)
  • 1-2 Indian green chilis
  • 3 cloves garlic
  • gooseberry sized tamarind, soaked in very little hot water
  • 1 tsp extra virgin olive oil
  • salt to taste

For the tempering/tadka
--------------------------
  • 1 tsp extra virgin olive oil
  • 1 garlic clove, crushed
  • 1 tsp black mustard seeds
  • 1 sprig curry leaves, chopped in half
Hardware
---------------
  • One large vessel that holds the spinach leaves
  • One small castiron skillet or small fry pan for the tempering or the tadka
Method
---------------
  • Put 1 tsp of the oil in the big skillet/vessel on medium heat, add the slit green chilis, 3 cloves of garlic and the spinach leaves. Cover and cook for 4-5 minutes until the spinach is completely wilted and reduced in volume. Take the spinach out and leave aside to cool.
  • In the same pan, without washing it, add the chana dal and the urad dal, fry until golden brown, set aside to cool.
  • Add the coriander seeds, methi seeds, jeera and dry roast them until the aroma of the spices fills your kitchen and makes you hungry :). Remove keep aside to cool.
  • Dry roast the red chilis, do NOT stick your nose anywhere near the stove while this is happening and make sure you open up some windows. Don't tell me I didn't warn you before :). Remove, set aside to cool.
  • Put all the above dry roasted ingredients and put them in a blender/food processor, grind it to a fine powder. Again, do not breathe in the fumes :).
  • Add the wilted spinach leaves in the blender with the ground spices, add salt, the tamarind juice (extract from the tamarind soaked) and grind it until the spinach is smooth. Check for salt, add more if needed. Remove to a serving dish.
For the tempering/tadka
--------------------------
  • Add the 1 tsp of oil in a small skillet on medium heat, add the mustard seeds, garlic clove, curry leaves and fry until the mustard seeds pop or the garlic turns light brown.
  • Add the tempering to the chutney.
Making Chapathi Chips

Software
---------------
  • 3/4 cup chapathi flour
  • pinch of salt
  • 1 tsp paprika
  • 1 tsp salt
  • Milk to mix the dough

Hardware
---------------
  • Cookie sheet

Method
---------------
  • Add pinch of salt to chapathi flour, mix.
  • Using the milk make a chapathi dough out of the flour.
  • Roll the chapathi on a floured surface into 1/8 inch thick circle.
  • Brush both sides with some olive oil and sprinkle paprika and salt on both sides.
  • Using a round cookie cutter, cut the chapathi into 3 inch diameter circles.
  • Place the chapathi chips into 500 degree oven, bake it for 5 minutes turning half way in between, until they are brown and crispy.
  • Serve with the spinach chutney.

Friday, April 07, 2006

A Foodbloggers Meme Around the World

YAY! My first meme. Three lovely ladies have tagged me - Priya of "Priya's Kitchen", Saffron Hut, Santhi of "Me and My Kitchen" have all tagged me for this meme. It is short and sweet and here I go straight to my answers!

Do check out the paninis - desi style, my other post from today!

1. Please list three recipes you have recently bookmarked from foodblogs to try:
  • Sailu's Palakayalu recipe - they seem so much easier to make than all the other Andhra savory snacks and look so yummy!
  • Indira's Home Made Soy Milk - I love cooking from scratch and I think with the amount of soymilk I drink, this could be a huge money saver :)
  • TasteCorner's Drumstick Sambhar - the sambhar looks so yummy and I wasn't familiar with Hemant Trivedi before so I want to give that a shot!

2. A food blog in your vicinity:
  • Hmm..this was a difficult question to answer. Even though, Sumi of Sumi's Kitchen is not very close to me, she seems to be the one.
3. A foodblog (or more) located far from you:
4. A foodblog (or several) you have discovered recently (where did you find it?):
  • Vaishali's Happy Burp - I do not remember how I found Vaishali. Probably from someone's comment pages.
  • Jeff's It just adds flavor - I found Jeff's blog because he had left a comment on one of my recipes
  • Genevieve's Bribe me with a Muffin - I found her on someone's comment page a couple of days ago
5. Any people or bloggers you want to tag with this meme?

Since I am entering this meme late, everyone is already tagged. So I decided to tag the bloggers I recently discovered :). I am tagging

Panini - Desi Style!

This is my entry to Anthony's curry mela this weekend!

I had some extra cooked extra mashed potatoes leftover from another meal and was trying to use them up. I was also thinking of something creative to make and I started looking around and found a loaf of french bread that I had bought for some soup. Never got to make the soup (most of the times, I have something in mind when I go buy groceries and then I come home and make something totally different with the ingredients I had bought).

So, I decided to make a desi style panini! A lot of people say that panini is just a fancy name for a fancy grilled cheese sandwich. I feel it is partly true myself. Usually very thin meat and cheese is put as a sandwich between some crusty Italian bread and the sandwich is then put in a panini maker for the panini. A lot of food network chefs do not use the panini maker and make the paninis in their own innovative ways. Although, I am a sucker for kitchen gadgets, there are a few things that I would never - the panini makers and quesadilla makers top the list :). I know a lot of you may disagree with me ;-).

Here's how you jazz up the coarsly mashed potatoes, desi style!

Software
---------------
  • 1 cup coarsely mashed potatoes
  • 1 small shallot, finely minced
  • 1 small tomato, finely chopped
  • 1 garlic clove, finely minced
  • 1 1/4" inch ginger, finely minced
  • 1 tsp coriander powder
  • 1 tsp chat masala (I used MDH)
  • 2 tbsp chopped cilantro
  • 1 tbsp chopped mint
  • 1 tsp extra virgin olive oil
Hardware
---------------
  • One small saucepan for the potatoes
Method
---------------
  • Put a small saucepan on medium-high heat. Add the oil.
  • Add the shallots, garlic and ginger, fry until translucent.
  • Add the chopped tomatoes, cook until they are slightly soft.
  • Add the mashed potatoes, the coriander powder, chat masala, salt. Stir until everything is blended and mixed together and heated through. Turn off the heat.
  • Add the cilantro and the mint. Mix.

Preparing the paninis

Software
---------------
  • 5-6 baby spinach leaves
  • 1 cup of shredded cheese or small chese slices (I used what I had on hand - a mix of montery jack and pepper jack)
Hardware
---------------
  • One large skillet/grill pan
  • One small skillet
  • One heavy object (read the method below)
Method
---------------
  • Cut the french bread into about about 1/2" thick slices. The french bread I used was not crusty so I toasted it on both sides on a grill pan so it became a little crunchy and lost the "softness".
  • Build a sandwich - take one french bread slice put some cheese, a couple of baby spinach leaves, some of the potato mixture and cheese in that order. Top the slice with another french bread slice.
  • Now carefully put that sandwich on a greased skillet/grill pan (I used a grill pan), put a smaller skillet over on top of the sandwich, and put a heavy object on the smaller skillet so it weighs the sandwich down completely - recommendations are foil covered brick, a huge flour/sugar sack, some canned food etc. I used a big flour container I had.
  • Cook for about 1-2 minutes then turn the sandwich on its other side and repeat!
Enjoy them as is or cut the sandwich into 4 pieces so they were bite sized. I did the latter.

After I typed the entire entry, I thought this would make a good entry to V.K.N's cooking competetion. But I haven't decided yet if I am going to submit this or not. It all depends on whatelse I am going to cook up with over the weekend!

Sri Rama Navami

Happy Sri Rama Navami to everyone!

Sri Ramanavami is a very famous Hindu festival that is celebrated to celebrate the birth of Lord Rama. This festival occurs in the either the month of March or April according to the regular calendar. Navami means nine. This festival is celebrated on the ninth day after the new moon.

When I was growing up I remember helping my mom make the "vadapappu" and "panakam" that was made as "prasadam" (offering) to Lord Rama. I also remember watching the "Sree Seetha Rama Kalyanam" live on T.V being broadcasted from Bhadrachalam.

Lovely Santhi of "Me and My Kitchen" has blogged about Sri Rama Navami and also included recipes to Vadapappu and Panakam. Do check them out!

Tuesday, April 04, 2006

Sorakaya/Anapakaya/Bottle Gourd Curry with Milk (Paluposina Koora)


One lonely bottle gourd had been awaiting its turn in my refrigerator since about a week. I finally got my hands on it tonight! This is my second Sorakaya/Anapakaya/Lauki preperation. The first one was a dish called dappalam I had posted earlier. For dessert tonight, it was bananas foster. I made the bananas foster in the same way I made the mango-bananas foster. Instead of the mango, I added one more banana. I also added about 4 tbsp of cream (milk can be subsituted) toward the end of the bananas foster cooking to make it a little more creamy and it was just delicious!

The sorakaya curry is very easy to prepare as you can see below!

Software
---------------
  • 1 medium sized sorakaya/bottle gourd, peeled and cut into cubes
  • 1 small-medium onion, diced
  • 3-4 Indian green chilis/pachi mirapakaylu, sliced fine
  • 2 cloves garlic, chopped fine
  • 1/2 inch piece of ginger, chopped fine
  • 1/2 tsp turmeric powder/pasupu/haldi
  • 1 tsp coriander powder
  • 2 tsp extra virgin olive oil
  • 1 tsp black mustard seeds/aavalu/rai
  • 1 tsp cumin seeds/jeelakarra/jeera
  • 1 sprig curry leaves, chopped
  • 1/3 cup milk
  • salt, to taste
  • cilantro to garnish
Hardware
---------------
  • One pressure cooker
Method
---------------
  • Put the pressure cooker on medium-high heat, add the oil, add the mustard and the jeera seeds.
  • After they pop add the curry leaves, green chilis, onion, garlic and ginger and fry until onions are translucent. Add the turmeric powder and stir.
  • Add the bottle gourd pieces and saute for about 1-2 minutes.
  • Add little water just to cover the bottle gourd pieces and cover the pressure cooker. Pressure cook for 1-2 whistles. Alternatively, you could cook covered in a regular saute pan until the bottle gourd pieces are soft.
  • After the pressure dies down, open the pressure, add the coriander powder and the milk and cook until the milk heats through.
  • Garnish with the cilantro leaves.
Serving Suggestion: This goes really well with plain white rice and chapathis.

Saturday, April 01, 2006

Discovering New Things - Spaghetti Squash - Lettuce Wraps with Spaghetti Squash and Asparagus

This is going to be a two birds with one shot kind of deal - my first ever entry to Kalyn's Weekend Herb blogging (Spaghetti Squash) and also a contest entry to VKN's cooking competetion.

I have always wanted to submit an entry to the Weekend Herb Blogging but never had the opportunity to do so. I am glad I am starting it this weekend!

I also wanted to submit an entry to My Dhaba's Virtual Cooking Competetion (theme: Appetizers) contest that was previously due March 31. For the longest time, I couldn't think of anything interesting to make and I did not have a lot of thinking time either. I thought "okay, there is always another time".

But all that changed as soon as I saw on the night of March 31st on VKN's site that the deadline had been extended to April 10th. But then again, I couldn't think of anything to make. Then early this morning (Saturday) I made my usual trip to the grocery store. The store was practically empty with maybe be 5-6 people in the entire store. I love to grocery shop at such times. I feel that I can get in and out fast and also "notice" a lot of different things I usually wouldn't have seen. For instance, I did not know the store had "spaghetti squash". As soon as I saw the squash, I had to put it in my basket. It was only 98 cents a pound and almost all the squashes were about 2-3 pounds each. I had no idea how to use it. I had seen Rachael Ray use it one time in one of her "carb friendly" meals she has been doing lately. She used it instead of regular spaghetti. I remember she had "cheesed" it up at the end in typical Rachael Ray style :-). I moved on all the while thinking how I could use the spaghetti squash and then an idea came to mind and I went back to the fresh veggies aisle to gather some other ingredients - Boston lettuce and Asparagus.

When I came back home, the first thing I did was look up the spaghetti squash. I discovered a lot of things about the squash -
  • it is a native American squash
  • 4 ounces of spaghetti squash only has 37 calories
  • the longer the squash, the sweeter it is
  • it will keep at room temperature for 2 months
  • can be cooked and frozen
  • can be baked, steamed, boiled or microwaved to cook
I got the information above from the following websites.

Wholehealthmd
Wikipedia

The reason I chose the lettuce wraps because they seem to be the fad in Asian cusine these days. This is my first time making them and since there is lettuce involved it made me feel not so guilty. These wraps are also a great alternative to those who are watching their carbs. The reason I associated spaghetti squash to the lettuce wraps is because of the whole rice noodles in the lettuce wrap deal. Now to the recipe...

Preparing the Spaghetti Squash


click on the images to enlarge
After reading instructions on the squash and online, I decided to go the "microwave" method, since that seemed easier and fast.

  • Cut the squash in half leghth-wise in half.
  • Scoop out all the seeds using your hands. Discard the seeds.
  • I only used one half of the squash. Take a microwave safe bowl large enough to fit the squash, put about 1/3 cup of water.
  • Take the half of the squash, put the squash cut side down in the bowl with water.
  • Microwave on high about 7-8 minutes. Start checking for doneness after about 6 min do 1 min increments there after. When checking for doneness, over turn the squash carefully with some tongs, and pierce using a fork, if the flesh is tender the squash is done.
  • Leave it aside for about 5 minutes until it cools off. Then carefully, the squash is still hot, put the squash on the counter, preferably on a towel to keep the squash from slipping on the counter. Also have another towel handy so you can sort of hold the squash to keep it from moving and using a fork, scrape off the flesh into a bowl. What you will see are marvellous strands of spaghetti. I was so amazed and excited about making nature's very own spaghetti :).
Making the filling for the lettuce wraps (makes about 4-5 wraps)

Software
---------------
  • 2 cups spaghetti squash "spaghetti"
  • 9 asparagus, sliced at an angle into very small slices
  • 1 green onion, sliced at an angle
  • 1/2 scallion, finely minced
  • 1 head boston lettuce
  • 2 garlic cloves, finely minced
  • 1 inch ginger, finely minced
  • 1/2 tsp red pepper flakes
  • 4-5 tbsp plum sauce
  • 1 tbsp soy sauce
  • 1 tbsp sesame seed oil
  • wasabi, as spicy as you want it to be (omit if you are not a huge fan of the wasabi)
  • salt, to taste
  • mint and cilantro leaves to garnish
Hardware
---------------
one skillet

Method
---------------
  • Seperate the lettuce leaves from lettuce head, discard the outer leaves if they are bruised, rinse in water and dry them on paper towels.
  • Put the skillet on medium-high, add the sesame seed oil, add the garlic, minced scallion, half of the green onion, saute till translucent. Add the ginger. Saute for a minute.
  • Add the diced asparagus, cook until asparagus is tender.
  • Add the soy sauce, plum sauce, red pepper flakes, salt and stir. Add the spaghetti squash and coat so the sauce is coated to the spaghetti. Turn of the stove.
  • Add the wasabi and stir. Do not breathe in the fumes :-).
  • When ready to serve, spoon the cooked filling into the lettuce leaves, fold the leaf over to close, garnish with mint, cilantro leaves and green onions.
Serving Suggestion: These will make perfect appetizers, a side for an Asian style brunch or even a light lunch!